
Cheesy Taco Breadsticks: The Ultimate Flavor Fusion
If you love tacos and can’t resist a cheesy, crispy breadstick, then Cheesy Taco Breadsticks are about to become your new obsession! This mouthwatering snack takes the best elements of Mexican-inspired tacos and combines them with the crunchy goodness of cheesy breadsticks. Whether you’re throwing a party, planning a game night, or just looking for a quick and satisfying treat, this recipe is a must-try.
In this article, we’ll dive deep into the world of Cheesy Taco Breadsticks, uncovering their origins, essential ingredients, foolproof preparation steps, and creative variations. You’ll also find expert tips to perfect your recipe, common mistakes to avoid, and delicious pairing suggestions. Plus, we’ll answer the most frequently asked questions to ensure you nail this recipe every time. Get ready to impress your family and friends with these irresistibly cheesy, taco-flavored breadsticks!
Introduction to Cheesy Taco Breadsticks
Why Cheesy Taco Breadsticks Are a Must-Try
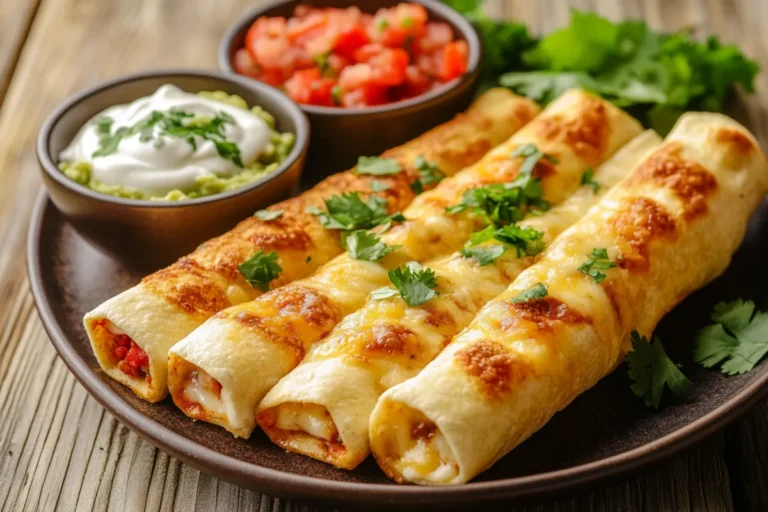
Cheesy Taco Breadsticks bring together two legendary comfort foods: tacos and breadsticks. The result? A crispy-on-the-outside, cheesy-and-savory-on-the-inside snack that’s packed with bold taco flavors. These stuffed breadsticks are perfect for dipping into salsa, guacamole, or sour cream, making them a crowd-pleaser at any gathering.
What’s even better? They’re incredibly easy to make! With simple ingredients like pizza dough, seasoned taco meat, and shredded cheese, you can whip up a batch in no time. Whether you’re craving a late-night snack or need an appetizer that will steal the show, Cheesy Taco Breadsticks check all the boxes.
The Perfect Snack for Any Occasion
These taco-stuffed breadsticks are versatile enough to be served at a variety of events. Whether you’re making them for a casual family dinner, a fun weekend snack, or a special celebration, they’re sure to be a hit. Plus, they can be customized to fit different dietary preferences—swap out the meat for black beans or lentils for a vegetarian version, or use gluten-free dough for a celiac-friendly option.
History and Origin of Cheesy Taco Breadsticks
The Birth of a Fusion Favorite
In the ever-evolving world of fusion cuisine, food lovers are constantly pushing boundaries, blending flavors from different cultures to create something entirely new. Cheesy Taco Breadsticks are a prime example of this delicious innovation, combining the rich, hearty essence of tacos with the crunchy, cheese-filled delight of classic breadsticks.
Breadsticks have long been a staple in Italian cuisine, often served as a crispy, garlic-infused side to pasta dishes. Meanwhile, tacos, deeply rooted in Mexican culinary history, are known for their bold seasonings and satisfying textures. The idea to merge these two favorites didn’t just happen overnight—rather, it emerged from the growing trend of fusion foods, where chefs and home cooks alike began experimenting with new ways to enjoy the best of both worlds.
From Experiment to Fan Favorite
As creative food mashups took over restaurants and home kitchens, taco-stuffed breadsticks found their way onto menus and social media feeds. Their easy-to-eat, shareable nature made them an instant hit at parties and gatherings. Today, they continue to grow in popularity, with countless variations available, from spicy jalapeño-infused versions to vegetarian-friendly twists.
Ingredients Needed for Cheesy Taco Breadsticks
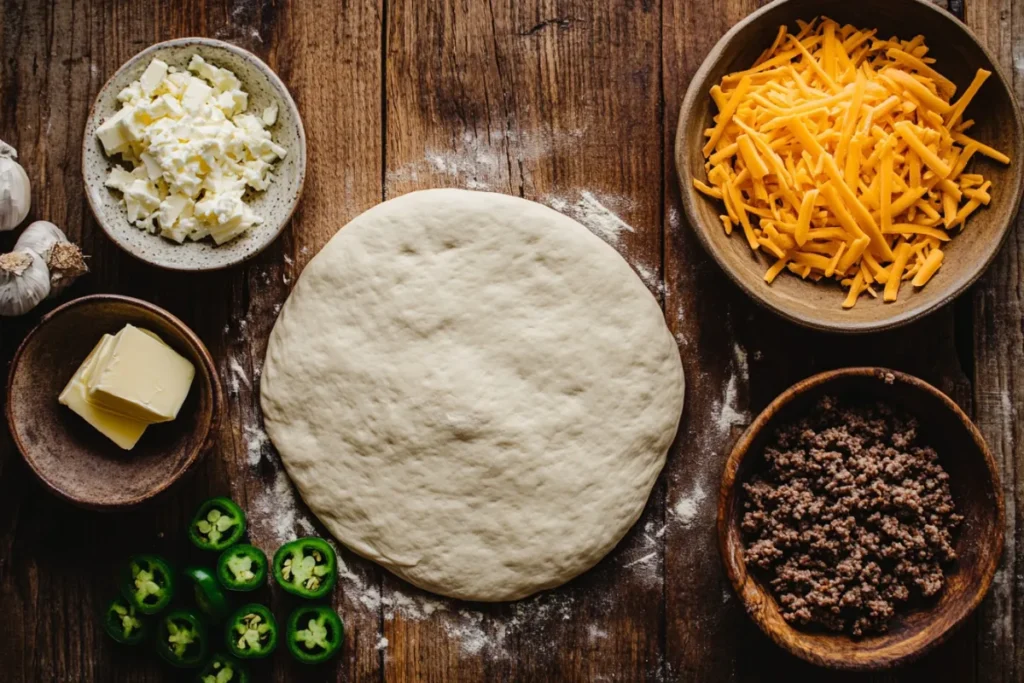
Essential Ingredients for the Perfect Cheesy Taco Breadsticks
Creating Cheesy Taco Breadsticks at home is surprisingly simple, but the key to making them truly irresistible lies in choosing the right ingredients. Every component plays a role in ensuring the perfect balance of crunch, cheesiness, and bold taco flavor.
1. The Dough – The Crispy, Golden Foundation
The base of your taco-stuffed breadsticks is pizza dough. You can go the homemade route for a more artisanal touch or use store-bought pizza dough for convenience. If you’re looking for a gluten-free option, there are plenty of gluten-free pizza crust alternatives available.
2. The Filling – A Flavor-Packed Taco Twist
At the heart of this dish is the seasoned taco meat. Traditional recipes call for ground beef, but you can easily substitute with ground turkey, chicken, or plant-based crumbles for a vegetarian-friendly option. To amp up the flavor, season the meat with a blend of taco seasoning, garlic powder, onion powder, and a dash of smoked paprika.
3. The Cheese – Gooey and Melty Goodness
The cheese is what gives these breadsticks their irresistible pull. A combination of mozzarella and sharp cheddar provides the perfect melt and bold taste. If you like an extra kick, pepper jack cheese is a great alternative. Not sure which cheese melts best? Check out this cheese varieties guide for more options!
4. Extra Flavor Boosters
Want to take your cheesy taco sticks up a notch? Toss in some diced jalapeños, sautéed onions, or bell peppers for added texture and spice. A sprinkle of fresh cilantro can also enhance the flavor.
5. The Finishing Touch – Buttery, Garlic Goodness
To achieve that golden-brown, slightly crispy crust, melted butter mixed with garlic powder is brushed on top before baking. This simple addition elevates the flavor, making each bite even more irresistible.
6. The Perfect Dipping Sauces
No Cheesy Taco Breadsticks are complete without dipping sauces! Pair them with salsa, guacamole, queso dip, or sour cream for an extra burst of flavor.
Step-by-Step Preparation Guide
How to Make Cheesy Taco Breadsticks Like a Pro
Now that you’ve gathered all the essential ingredients, it’s time to bring your Cheesy Taco Breadsticks to life! Follow this easy, step-by-step guide to create the perfect crispy, cheesy, and flavor-packed snack.
Step 1: Prepare the Dough
If using homemade dough, allow it to rest at room temperature for at least 30 minutes before rolling it out. This prevents the dough from being too elastic and snapping back when stretched. If you’re opting for store-bought pizza dough, simply roll it out on a lightly floured surface into a large rectangle, about ¼-inch thick.
Step 2: Cook the Taco Meat
In a skillet over medium heat, cook the ground beef (or vegetarian alternative) until browned. Drain any excess grease, then add taco seasoning and ¼ cup of water, stirring well to coat the meat evenly. Let it simmer for 2-3 minutes until the flavors meld together. Set aside to cool slightly.
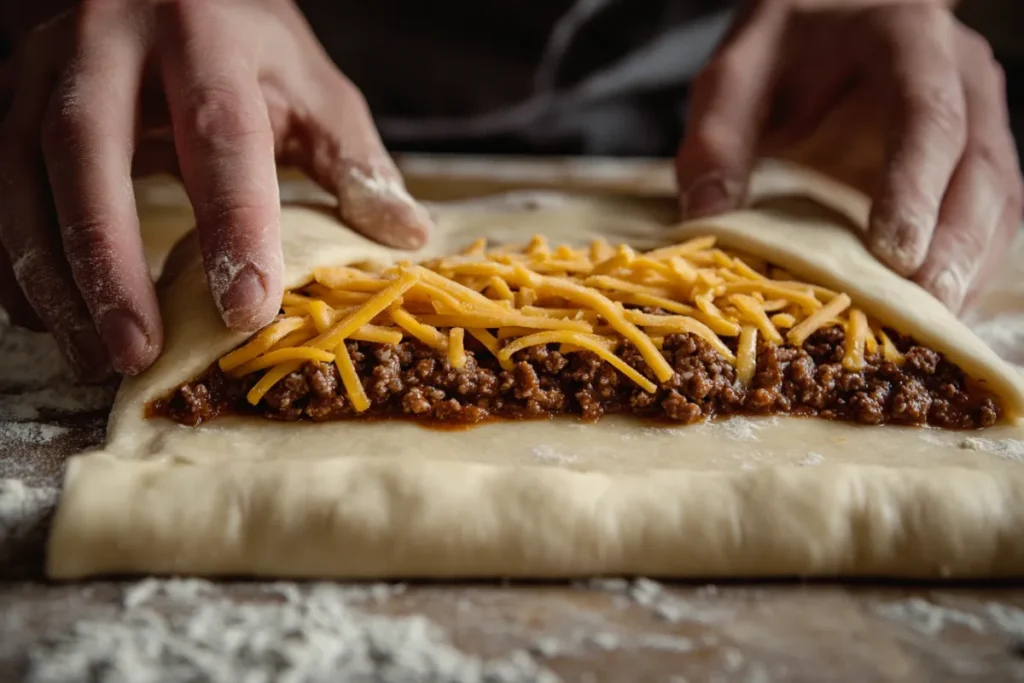
Step 3: Assemble the Cheesy Taco Breadsticks
- Spread the seasoned taco meat evenly over one half of the rolled-out dough.
- Sprinkle a generous amount of shredded cheese (mozzarella, cheddar, or a blend) on top of the taco filling.
- Fold the other half of the dough over the filling, pressing down gently to seal.
- Use a pizza cutter or a sharp knife to slice the dough into 1-inch-wide strips.
Step 4: Seal and Arrange the Breadsticks
To prevent the filling from spilling out during baking, press the edges of each breadstick together firmly. Then, place the breadsticks on a parchment-lined baking sheet, spacing them slightly apart to allow for even cooking.
Step 5: Add a Buttery Garlic Finish
For that golden, crispy crust, mix melted butter with garlic powder and brush it generously over each breadstick. You can also sprinkle a pinch of taco seasoning on top for extra flavor.
Step 6: Bake Until Perfectly Crispy
Preheat your oven to 375°F (190°C) and bake for 12-15 minutes, or until the breadsticks are golden brown and crispy. If you want extra crunch, broil them for the last 1-2 minutes.
Step 7: Serve and Enjoy!
Let the cheesy taco sticks cool slightly before serving. Pair them with salsa, guacamole, queso dip, or sour cream for the ultimate dipping experience.
Alternative Cooking Methods
Switch Up Your Cooking Style for Maximum Crunch
While baking is the go-to method for making Cheesy Taco Breadsticks, why stop there? If you’re looking for an even crispier bite, a smokier flavor, or just a faster way to prepare them, there are plenty of alternatives. Whether you’re using an air fryer, grill, or pizza oven, each method brings a unique texture and taste to these taco-stuffed breadsticks.
1. Air Fryer – The Quick & Crispy Option
If you love extra crunch, the air fryer is a game-changer. This method not only speeds up cooking but also gives the breadsticks a beautifully crispy exterior without drying out the cheesy filling.
How to air fry Cheesy Taco Breadsticks:
- Preheat the air fryer to 375°F (190°C).
- Arrange the breadsticks in a single layer, making sure they aren’t touching.
- Lightly brush them with butter and garlic for extra flavor.
- Air fry for 8-10 minutes, flipping halfway through for even crispiness.
- Let them cool for a couple of minutes before serving.
2. Grilling – A Smoky Outdoor Twist
Love that charred, smoky flavor? Grilling taco-flavored breadsticks is the way to go! This method works best over indirect heat to prevent burning while still achieving a crispy crust.
How to grill them:
- Preheat the grill to medium heat (about 375°F/190°C).
- Place the breadsticks on the grill away from direct flames.
- Cover and grill for 4-5 minutes per side, flipping carefully.
- Brush with butter or olive oil before removing from the grill.
3. Pizza Oven – The Crispy & Chewy Balance
If you have a pizza oven, you’re in for a treat! This method gives you the perfect balance of crispy and chewy, similar to a wood-fired pizza.
How to use a pizza oven:
- Preheat the oven to 700°F (370°C) for at least 30 minutes.
- Place the breadsticks directly on a pizza stone or baking steel.
- Bake for 3-5 minutes, rotating halfway through.
Serving Suggestions and Pairings
The Perfect Dips for Cheesy Taco Breadsticks
What’s better than warm, crispy Cheesy Taco Breadsticks? Dipping them into a bold, flavorful sauce! These taco-stuffed breadsticks are delicious on their own, but pairing them with the right dips takes them to the next level. Here are some top picks:
- Classic Salsa – A fresh, zesty dip that balances the richness of the cheese and taco filling. Try a chunky pico de gallo or a smoky roasted tomato salsa.
- Queso Dip – A creamy, cheesy dip that enhances the gooey goodness inside the breadsticks. Add a little jalapeño for an extra kick.
- Guacamole – The smooth and buttery texture of avocado pairs beautifully with the crunchy breadsticks.
- Sour Cream with Lime – A tangy and cooling dip that cuts through the spice and adds a refreshing contrast.
Side Dishes to Complete the Meal
Want to turn your cheesy taco sticks into a full meal? Serve them with one of these Mexican-inspired sides:
- Mexican Chopped Salad – A fresh, vibrant salad with crisp lettuce, cherry tomatoes, corn, black beans, and a tangy lime dressing.
- Loaded Nachos – Crunchy tortilla chips topped with cheese, beans, jalapeños, and salsa make a great side to complement the breadsticks.
- Refried Beans – A creamy, protein-packed side that pairs well with the taco flavors in the breadsticks.
Beverage Pairings for the Ultimate Experience
To round out your meal, choose a refreshing non-alcoholic beverage that enhances the flavors of the dish:
- Iced Tea with Citrus – The mild sweetness and acidity of iced tea balance the cheesy, savory flavors.
- Sparkling Lime Water – A bubbly, refreshing drink that cleanses the palate.
- Agua Fresca – A fruit-infused water, such as watermelon or cucumber-lime, for a touch of natural sweetness.
Variations of Cheesy Taco Breadsticks
Customize Your Cheesy Taco Breadsticks for Any Taste
One of the best things about Cheesy Taco Breadsticks is how easy they are to customize. Whether you love extra heat, follow a vegetarian diet, or need a gluten-free option, there’s a variation to match your taste. Let’s explore some creative ways to switch up this delicious snack!
1. Spicy Cheesy Taco Breadsticks for Heat Lovers
If you crave bold, fiery flavors, kick up the spice level with these add-ins:
- Jalapeños – Dice fresh or pickled jalapeños and mix them into the filling for a spicy kick.
- Hot Sauce – Drizzle a few drops of your favorite hot sauce inside the breadsticks before sealing.
- Spicy Cheese – Swap regular cheddar for pepper jack or habanero-infused cheese for extra heat.
- Crushed Red Pepper – Sprinkle red pepper flakes on top of the breadsticks before baking for an extra punch.
2. Vegetarian Cheesy Taco Breadsticks
Want to enjoy taco-stuffed breadsticks without meat? These plant-based swaps ensure all the flavor, minus the meat:
- Black Beans & Corn – Mash black beans with taco seasoning and mix with sweet corn for a hearty filling.
- Lentils or Chickpeas – Cooked lentils or mashed chickpeas make a great meat substitute.
- Plant-Based Meat Crumbles – Use seasoned soy-based crumbles to mimic the texture of taco meat.
3. Gluten-Free Cheesy Taco Breadsticks
For a gluten-free version, all you need is gluten-free pizza dough. Many brands offer pre-made gluten-free dough, or you can make your own using almond flour or a blend of gluten-free flours. Be sure to roll out the dough gently to avoid cracking.
4. Extra Cheesy Stuffed Breadsticks
If you love that gooey, melty texture, add extra cheese inside the filling and on top before baking. Try a mix of mozzarella, cheddar, and Monterey Jack for the best melt factor.
Tips for Perfecting Your Recipe
Pro Tips for the Best Cheesy Taco Breadsticks
Mastering Cheesy Taco Breadsticks isn’t just about following the recipe—it’s about using the right techniques to get that perfectly crispy, cheesy, and flavorful result. Here are some expert tips to take your breadsticks to the next level.
1. Use a Cheese Blend for Ultimate Melt
For the best cheesy stretch, don’t rely on just one type of cheese. A combination of mozzarella and cheddar works wonders—mozzarella adds the gooey texture, while cheddar brings sharp, bold flavor. If you like a little spice, add some pepper jack to the mix.
2. Don’t Overstuff the Dough
It’s tempting to pack in as much filling as possible, but overloading the dough can lead to leaks and uneven baking. Stick to a thin, even layer of taco meat and cheese to ensure everything stays inside when you slice and bake.
3. Bake on Parchment Paper
Using parchment paper makes cleanup a breeze and prevents the breadsticks from sticking to the baking sheet. If you don’t have parchment paper, lightly grease the pan with olive oil.
4. Brush with Garlic Butter for Extra Flavor
For that restaurant-quality finish, don’t skip the garlic butter! Brush the breadsticks with melted butter mixed with garlic powder before baking, then add another light coating right after they come out of the oven for extra richness.
5. Let Them Cool Slightly Before Serving
Fresh out of the oven, the cheese inside is piping hot. Let the breadsticks sit for 3-5 minutes before serving to avoid burns and allow the flavors to settle.
Common Mistakes to Avoid
Avoid These Pitfalls for Perfect Cheesy Taco Breadsticks
Even the simplest recipes can go wrong if you overlook key steps. To make sure your Cheesy Taco Breadsticks turn out crispy, cheesy, and packed with flavor, watch out for these common mistakes.
1. Overloading the Dough with Filling
It’s tempting to pile on the taco meat and cheese, but too much filling can cause the breadsticks to burst open while baking. This not only makes them messy but also affects the texture. Stick to a thin, even layer of filling to ensure they hold their shape.
2. Skipping the Dough Resting Time
If you’re using homemade dough, don’t rush the process! Skipping the resting time can make the dough tough and difficult to roll out. Allow the dough to sit at room temperature for at least 30 minutes before rolling it out for the best texture.
3. Baking at the Wrong Temperature
An oven that’s too hot can burn the edges before the cheese fully melts, while a low temperature might leave the dough undercooked and doughy. Always preheat your oven to 375°F (190°C) for even cooking and golden-brown perfection.
4. Forgetting to Seal the Edges
If you don’t press the edges firmly after slicing, the filling may leak out during baking. To prevent this, pinch the edges together or use a fork to crimp them for a secure seal.
5. Not Using Parchment Paper or Greasing the Pan
Skipping parchment paper or forgetting to grease the baking sheet can lead to sticking and tearing when removing the breadsticks. Always line your pan or lightly grease it for a smooth baking process.
Health Considerations
How to Make Cheesy Taco Breadsticks Healthier
There’s no denying that Cheesy Taco Breadsticks are indulgent, cheesy, and oh-so-delicious, but they can also be high in calories and fat. The good news? With a few smart swaps, you can lighten up this recipe without sacrificing flavor.
1. Swap the Meat for a Leaner Option
Traditional recipes use ground beef, but switching to lean ground turkey or chicken significantly reduces the fat content. If you prefer a meat-free alternative, try plant-based crumbles, lentils, or black beans for a protein-packed, vegetarian-friendly version.
2. Choose Whole-Wheat or Gluten-Free Dough
Most store-bought pizza dough is made with refined white flour, which lacks fiber. Using whole-wheat dough adds extra fiber and nutrients, keeping you fuller for longer. For those with gluten sensitivity, opt for gluten-free pizza dough to make this dish more digestible.
3. Reduce the Cheese Without Losing Flavor
Cheese is the star of the show, but you can still enjoy its creamy goodness without overdoing it. Try using half the amount and incorporating stronger-flavored cheeses like sharp cheddar so a little goes a long way.
4. Load Up on Veggies
Adding bell peppers, mushrooms, onions, or spinach not only boosts flavor but also increases the dish’s vitamin and mineral content. You can even mix finely chopped veggies into the taco filling for extra nutrients.
5. Bake Instead of Frying
While some versions of stuffed breadsticks are deep-fried, baking (or air frying) keeps them crispy without the extra oil, making them a lighter choice.
By making these small tweaks, you can turn Cheesy Taco Breadsticks into a healthier, guilt-free treat that still delivers all the flavor you crave!
Cheesy Taco Breadsticks in Popular Culture
A Social Media Sensation
If you’ve scrolled through TikTok, Instagram, or YouTube, chances are you’ve come across viral videos of Cheesy Taco Breadsticks. The ooey-gooey cheese pulls and crispy, golden crusts make them a picture-perfect snack that people love to share.
Food bloggers and home chefs have put their own spin on the recipe, experimenting with different cheeses, fillings, and seasonings to create unique versions. Some even go a step further, stuffing them with extra spicy ingredients, bacon alternatives, or unexpected add-ins like avocado and beans.
From Home Kitchens to Restaurant Menus
Thanks to their popularity online, some restaurants have started serving variations of taco-filled breadsticks as appetizers or snacks. Whether in casual eateries or fusion-style bistros, these cheesy, taco-flavored breadsticks have found a place on menus, catering to customers looking for comfort food with a creative twist.
Why Are They So Popular?
It’s simple—Cheesy Taco Breadsticks check all the right boxes:
Easy to make
Fun to eat
Perfect for sharing
Customizable to different tastes
Frequently Asked Questions (FAQs)
Your Top Questions About Cheesy Taco Breadsticks – Answered!
Got questions about making the perfect Cheesy Taco Breadsticks? We’ve got you covered! Here are the most common FAQs to help you nail this recipe every time.
1. Can I prepare Cheesy Taco Breadsticks in advance?
Yes! You can assemble the breadsticks and refrigerate them uncooked for up to 24 hours before baking. When you’re ready, just pop them in the oven—no need to let them come to room temperature.
2. What are the best cheeses to use?
A blend of cheeses gives the best flavor and melt. Mozzarella provides that classic stretchy texture, cheddar adds sharpness, Monterey Jack brings creaminess, and pepper jack delivers a spicy kick.
3. How do I store and reheat leftovers?
Store any leftover taco-stuffed breadsticks in an airtight container in the fridge for up to 3 days. To reheat, bake them at 350°F (175°C) for 5-7 minutes until warm and crispy again. Avoid microwaving, as it can make them soggy.
4. Can I freeze Cheesy Taco Breadsticks?
Absolutely! You can freeze them before or after baking:
- Before baking: Assemble the breadsticks, place them on a tray, and freeze until solid. Then transfer to a freezer bag and store for up to 3 months. Bake straight from frozen—just add a few extra minutes.
- After baking: Cool completely, wrap tightly, and freeze. Reheat in the oven at 375°F (190°C) until warmed through.
5. What meat substitutes work best for vegetarians?
For a meat-free version, try black beans, lentils, or plant-based meat crumbles. These alternatives still provide that hearty, taco-inspired filling while keeping the texture satisfying.
6. How can I make the recipe spicier?
Love heat? Add diced jalapeños to the filling, use spicy taco seasoning, or drizzle hot sauce over the breadsticks before baking. For an extra fiery twist, sprinkle crushed red pepper flakes on top.
Now that you have all the answers, it’s time to wrap things up with a final thought!
Conclusion
Cheesy Taco Breadsticks are the ultimate snack—crispy on the outside, cheesy and flavorful on the inside, and completely customizable to your taste. Whether you’re serving them for a party, a casual snack, or even as part of a full meal, they’re guaranteed to be a hit.
With simple ingredients and easy-to-follow steps, this recipe is perfect for beginners and experienced cooks alike. Plus, the flexibility of different cheeses, fillings, and spice levels means you can make it your own every time.
Here is another excellent recipes you might enjoy, please be sure to try :