
Introduction to Oven Baked Chicken Breasts
Oven-baked chicken breasts are a staple in many households, offering a healthy, flavorful, and convenient way to prepare poultry. Unlike frying, which requires excessive oil, baking retains moisture while reducing unnecessary fats, making it a nutrient-rich and heart-healthy option. Whether you’re a beginner in the kitchen or a seasoned cook, mastering the perfect oven-baked chicken breasts will elevate your meals and provide a versatile protein that pairs well with a variety of side dishes.
This guide covers everything you need to know—from choosing the right type of chicken to preparation, seasoning, and baking techniques. You’ll also learn pro tips to keep your chicken juicy, flavorful, and never dry. By the end of this article, you’ll have a foolproof method to create tender, succulent, and perfectly seasoned oven-baked chicken breasts every single time. Whether you’re meal prepping for the week or preparing a quick family dinner, this ultimate guide will ensure you get flawless results with minimal effort.
What Are Oven Baked Chicken Breasts?
Oven-baked chicken breasts are boneless, skinless chicken breasts cooked in an oven at a consistent temperature until they reach perfect doneness. Unlike stovetop methods, baking allows for even heat distribution, which helps retain the natural juices when cooked correctly.
One of the biggest advantages of baking chicken breasts is their versatility. They can be seasoned in countless ways—from simple salt and pepper to herb-infused marinades and spicy rubs. The cooked chicken can then be used in a variety of dishes, such as salads, sandwiches, pasta, grain bowls, and meal preps. With the right baking techniques, your chicken will turn out juicy, tender, and packed with flavor every time.
Health Benefits of Baking Chicken
Baking chicken breasts is one of the healthiest ways to prepare them, as it requires little to no added fats. Unlike deep-frying, which increases calorie intake, baking retains the natural leanness of chicken while still allowing it to be moist and flavorful.
Additionally, oven-baked chicken is a high-protein meal that supports muscle growth, weight management, and overall health. It is packed with B vitamins, which aid in energy production and metabolism, and minerals like selenium and phosphorus, essential for immune function and bone health.
Baking also reduces the formation of harmful compounds that occur with high-heat frying methods, making it a safer and cleaner way to cook lean protein. Whether you’re following a high-protein diet, a low-carb lifestyle, or simply trying to eat clean, oven-roasted chicken breasts are a nutritious and delicious option.
Selecting the Right Chicken Breasts
Choosing high-quality chicken breasts is crucial to achieving the best texture, flavor, and juiciness. Whether you prefer fresh or frozen, knowing how to select the right cut can make all the difference.
Fresh vs. Frozen Chicken Breasts: Which Is Better?
The choice between fresh and frozen chicken breasts depends on convenience, availability, and texture preferences.
✔ Fresh Chicken Breasts:
- Tend to have better texture and moisture retention.
- Absorb marinades more effectively.
- Have a shorter shelf life (must be cooked within a few days).
✔ Frozen Chicken Breasts:
- More convenient and can be stored for months.
- Need proper thawing to prevent bacterial growth and uneven cooking.
- May have slightly altered texture due to ice crystal formation.
Pro Tip: If using frozen chicken, always thaw properly—preferably in the refrigerator for 12-24 hours. If you’re in a hurry, the cold water thawing method (changing the water every 30 minutes) is the best alternative. Avoid microwave thawing, as it can cause uneven cooking.
Understanding Chicken Breast Grades: Choosing the Best Quality
In the U.S., chicken is graded into three categories: A, B, and C, based on appearance and quality.
✔ Grade A Chicken Breasts
- The highest quality, with plump, moist, and well-formed meat.
- No bruising, discoloration, or excess fat—ideal for baking, grilling, or roasting.
✔ Grade B & C Chicken Breasts
- May contain more fat, connective tissue, and irregular shapes.
- Usually used for processed chicken products rather than whole cooking.
For the best results, always opt for Grade A chicken breasts, whether buying organic, free-range, or conventional poultry. If purchasing organic chicken, ensure it carries a USDA Organic Certification for ethical sourcing and better flavor.
Preparing Chicken Breasts for Baking
Selecting high-quality chicken breasts is just the first step. Proper preparation ensures even cooking, maximum juiciness, and incredible flavor. Whether you’re thawing frozen chicken, trimming excess fat, or using a simple brine, these pro tips will help you achieve perfectly baked chicken breasts every time.
Thawing Frozen Chicken Properly
If you’re using frozen chicken breasts, thawing them correctly is essential for safe cooking and optimal texture. Improper thawing can result in uneven cooking or, worse, bacterial growth. Here’s how to do it safely and effectively:
✔ Refrigerator Thawing (Best Method) – Place the chicken breasts in a sealed container and thaw them in the fridge for 12-24 hours. This method keeps the meat at a safe temperature and preserves its natural texture and moisture.
✔ Cold Water Thawing (Faster Method) – If you’re short on time, submerge the chicken breasts in cold water, changing the water every 30 minutes. They should thaw within 1-2 hours, depending on thickness.
🚫 Avoid Room Temperature Thawing – Leaving chicken out on the counter can lead to bacterial contamination. Always use safe thawing methods to prevent foodborne illness.
Trimming and Cleaning Techniques
Before seasoning your oven baked chicken breasts, you need to remove unwanted parts that may affect the final texture.
✔ Trim Excess Fat – Use a sharp knife to remove any visible fat or cartilage. This prevents chewy, unappetizing bites.
✔ Avoid Rinsing Raw Chicken – Washing chicken under running water spreads bacteria around your kitchen. Instead, pat the meat dry with a paper towel to remove excess moisture before seasoning.
Pounding for Even Thickness: The Secret to Perfect Cooking
Raw chicken breasts are often thicker on one end and thinner on the other, leading to uneven cooking—the thick side takes longer to cook, while the thinner end dries out. The fix? Pounding the chicken to an even thickness!
How to Properly Pound Chicken Breasts
- Place each chicken breast between two sheets of parchment paper or plastic wrap.
- Use a meat mallet, rolling pin, or heavy skillet to gently flatten the thickest part.
- Aim for a uniform ¾-inch thickness for even cooking and juicier results.
✔ Why This Works: Flattening the meat ensures even heat distribution, preventing overcooked edges while keeping the entire piece tender.
Brining: The Secret to Extra Juicy Baked Chicken
Ever wonder why restaurant chicken is always juicy and flavorful? The secret is brining—a simple yet powerful technique that enhances moisture retention.
Easy Brine Recipe for Chicken Breasts
- 4 cups of water
- ¼ cup of salt
- Optional: Add garlic, herbs, or lemon slices for extra flavor.
✔ How to Brine: Submerge the chicken breasts in the saltwater solution for 30 minutes to 1 hour, then rinse and pat dry before seasoning.
✔ Why This Works: Brining draws moisture into the meat, preventing dryness even at higher baking temperatures.
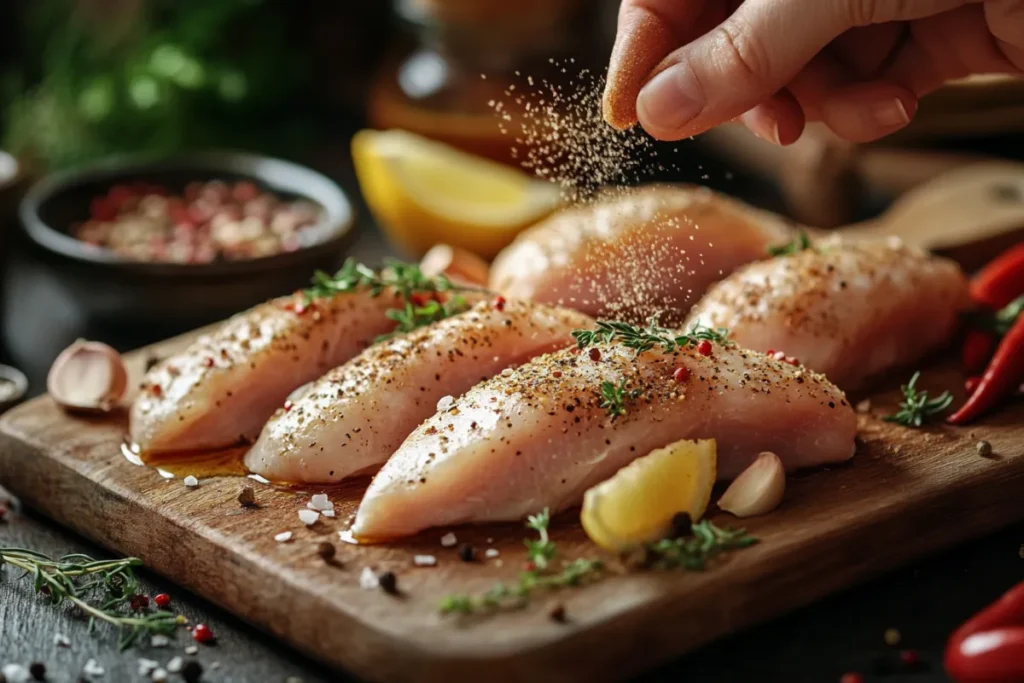
Seasoning and Marinades for Oven Baked Chicken Breasts
Now that your chicken breasts are properly prepped, it’s time to add some bold, mouthwatering flavors. Seasoning is what transforms a simple piece of chicken into a delicious, crave-worthy meal. Whether you prefer classic simplicity, herb-infused flavors, or spicy, bold rubs, the right seasoning can make all the difference.
Simple Salt and Pepper: The Classic Seasoning
Sometimes, less is more! If you want to highlight the natural flavors of your oven baked chicken breasts, a simple salt and pepper seasoning works wonders.
✔ How to Season:
- Sprinkle evenly with kosher salt and freshly ground black pepper on both sides.
- Drizzle with a little olive oil to enhance moisture retention.
- For a subtle citrusy boost, add lemon zest or a squeeze of fresh lemon juice.
✔ Why It Works: The salt enhances the natural umami flavor of the chicken, while black pepper adds a mild spice without overpowering.
Herb Blends and Marinades: Elevate the Flavor
For a more fragrant, herbaceous taste, an herb blend or marinade is the way to go. Garlic, thyme, rosemary, and lemon juice create a fresh, earthy flavor that pairs beautifully with chicken breasts.
✔ Simple Herb Seasoning Blend:
- 1 tsp garlic powder
- 1 tsp onion powder
- ½ tsp dried thyme
- ½ tsp dried rosemary
- ½ tsp paprika
- Drizzle of olive oil
✔ Marinade Option:
For a stronger infusion of flavor, mix:
- ¼ cup olive oil
- 2 tbsp lemon juice
- 1 tsp honey
- 1 tsp Dijon mustard
- 1 tsp soy sauce (for a deeper umami flavor)
Let the chicken marinate for at least 30 minutes, or ideally overnight, for maximum taste absorption.
Spicy Rubs for Extra Kick
If you love bold, smoky flavors with a bit of heat, a spicy rub is the way to go. This blend gives oven baked chicken breasts a fiery kick without overpowering the natural flavors.
✔ Spicy Dry Rub Recipe:
- 1 tsp paprika
- ½ tsp cayenne pepper
- 1 tsp garlic powder
- ½ tsp black pepper
- ½ tsp cumin
- ½ tsp salt
✔ How to Apply:
- Pat the seasoning mix onto both sides of the chicken breasts.
- Let the spices absorb for at least 15 minutes before baking.
- For extra depth, drizzle with a touch of honey to balance the heat.
Marinating Times and Pro Tips
Marinating allows chicken breasts to soak in deeper flavors, making them juicier and more flavorful.
✔ Marinating Time Guide:
- 30 minutes: Adds mild flavor and moisture.
- 4+ hours: Allows spices and acids to break down proteins for a more tender bite.
- Overnight: Maximum flavor absorption (especially for herb and citrus-based marinades).
✔ Pro Tip: If using acidic ingredients (like lemon juice, vinegar, or yogurt), don’t marinate longer than 12 hours—they can break down the meat too much, making it mushy.
Part 5: Baking Techniques for Perfectly Juicy Oven Baked Chicken Breasts
Now that your chicken breasts are seasoned and marinated to perfection, it’s time to bake them! But wait—if you’ve ever had dry, rubbery chicken, you know that baking technique matters just as much as seasoning. With the right temperature, timing, and baking methods, you’ll get tender, juicy chicken breasts every time.
Choosing the Right Bakeware: What Works Best?
The type of baking dish you use can affect cooking time, moisture retention, and overall texture.
✔ Rimmed Baking Sheet – The best option for even cooking. It allows heat to circulate properly, ensuring that your chicken breasts cook uniformly.
✔ Glass or Ceramic Dish – Holds heat well but may require longer baking times since it doesn’t heat as quickly as metal pans.
✔ Cast Iron Skillet – Ideal if you want to sear the chicken first, then finish it in the oven. This method adds extra depth of flavor.
Avoid Overcrowding the Pan – If chicken breasts are placed too close together, they will steam rather than bake, leading to soggy chicken instead of a golden-brown crust.
Preheating the Oven: Why It Matters
Skipping the preheat step? Big mistake! A properly heated oven ensures that your chicken breasts cook evenly and quickly, preventing dry edges or undercooked centers.
✔ Always preheat to 400°F (200°C) before placing the chicken inside. This allows the outside to seal in moisture quickly, keeping the inside juicy.
✔ For extra crispy edges, preheat the baking sheet as well—just place it in the oven while it heats up, then add the chicken breasts once it’s hot.
Optimal Baking Temperatures and Cooking Times
The best oven temperature depends on how thick your chicken breasts are and how juicy you want them to be.
375°F (190°C) for 25-30 minutes – A lower temperature allows for gentler cooking, reducing moisture loss.
400°F (200°C) for 20-25 minutes – A balanced approach that cooks the chicken evenly while keeping it tender.
425°F (220°C) for 18-22 minutes – High heat gives a slightly crispier exterior while keeping the inside moist.
✔ Pro Tip: The best way to know when chicken is done is by checking the internal temperature. Use a meat thermometer and remove from the oven when it hits 165°F (75°C).
Using Parchment Paper for Moisture Retention
Want juicy, tender chicken without any sticking? Parchment paper is your best friend!
✔ Why Use Parchment Paper?
- It prevents the chicken from sticking to the baking sheet.
- It helps retain moisture while still allowing the outside to brown.
- It makes clean-up effortless—just toss it when you’re done!
✔ How to Use It:
- Line your baking sheet with parchment paper before placing the chicken breasts on top.
- For extra moisture retention, lightly tent the chicken with foil for the first half of baking, then remove it for the last 10 minutes to let the edges crisp up.
How to Check If Your Chicken is Done: Tools & Tricks
You don’t want undercooked or overcooked chicken. The best way to ensure perfectly cooked oven baked chicken breasts? A meat thermometer!
✔ Internal Temperature for Perfectly Cooked Chicken:
- The safe minimum temperature for fully cooked chicken is 165°F (75°C).
- Insert a digital meat thermometer into the thickest part of the chicken breast.
- If it reads 165°F, it’s ready!
🚫 Don’t Have a Thermometer?
- Slice into the thickest part—juices should run clear, and the meat should be white with no pink center.
✔ Pro Tip: Let chicken rest for 5-10 minutes before cutting. This allows the juices to redistribute, keeping it moist and tender.
Resting and Slicing for the Juiciest Oven Baked Chicken Breasts
You’ve baked your chicken breasts to golden perfection, but hold on—don’t cut into them just yet! Resting and slicing properly ensures that every bite remains tender, juicy, and flavorful. If you rush this step, you risk losing all the natural juices, making the meat dry.
Why Resting Chicken is Essential
One of the biggest mistakes people make is slicing into chicken immediately after taking it out of the oven. But why is this a problem?
✔ Resting allows juices to redistribute. While baking, moisture gets pushed toward the surface of the chicken breast. If you cut into it too soon, all that juice will spill out, leaving dry, tough meat.
✔ It helps finish the cooking process. The carryover heat continues to cook the chicken slightly after removing it from the oven. Letting it rest ensures the internal temperature stabilizes for a perfectly tender bite.
✔ It enhances overall texture and flavor. When juices have time to reabsorb, every slice will be moist, soft, and packed with flavor.
How Long Should Chicken Rest?
Let your oven baked chicken breasts rest for 5-10 minutes before slicing. This simple step makes a huge difference in moisture retention.
✔ Pro Tip: Lightly tent the chicken with aluminum foil while resting—this keeps it warm without trapping too much steam, which could make the exterior soggy.
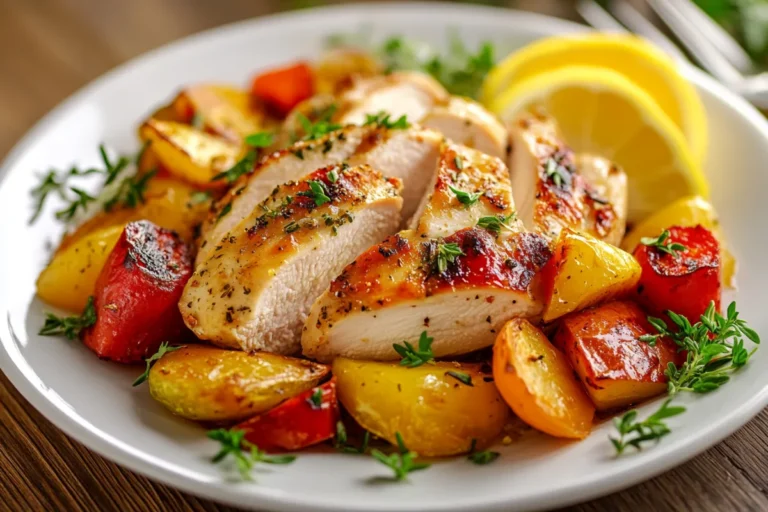
How to Slice Chicken Breasts the Right Way
Now that your chicken breasts have rested, it’s time to slice them properly. Slicing the wrong way can make even the juiciest chicken feel tough and chewy.
✔ Cut Against the Grain – This is the golden rule for tender chicken. Look for the direction of the muscle fibers and slice perpendicular to them. This shortens the fibers, making the meat softer and easier to chew.
✔ Use a Sharp Knife – A dull knife shreds the meat, causing moisture loss. Always use a sharp chef’s knife or carving knife for clean cuts.
✔ Slice at an Angle – Cutting at a slight diagonal instead of straight down increases the surface area, making each piece juicier and more tender.
Best Slicing Techniques for Different Dishes:
- Thin Slices: Perfect for salads, wraps, and sandwiches.
- Thicker Slices: Ideal for pasta dishes and hearty meals.
- Shredded Chicken: Great for tacos, burrito bowls, and meal prep.
Best Ways to Serve Sliced Baked Chicken Breasts
Now that your chicken breasts are sliced perfectly, here are some delicious serving ideas:
Over a Fresh Salad: Thinly sliced juicy baked chicken pairs beautifully with greens, nuts, and vinaigrette.
Stuffed into Wraps or Sandwiches: Layer with lettuce, tomato, and avocado for a protein-packed meal.
Tossed into Pasta or Grain Bowls: Mix with quinoa, rice, or whole wheat pasta for a hearty, balanced meal.
As a Standalone Protein: Serve with roasted veggies and a dipping sauce for a simple, healthy dinner.
Serving Suggestions for Oven Baked Chicken Breasts
Now that your oven baked chicken breasts are perfectly cooked and sliced, let’s talk about how to serve them! The beauty of baked chicken is its versatility—it pairs well with vegetables, salads, pasta, and more. Whether you’re aiming for a light and healthy meal or a hearty and filling dish, there are endless ways to enjoy this protein-packed favorite.
Pairing Oven Baked Chicken with Vegetables
For a well-balanced meal, serve your juicy baked chicken breasts with nutrient-rich vegetables. This not only enhances flavor and texture but also boosts the overall nutrition of your meal.
✔ Best Vegetables to Serve with Chicken:
- Roasted Vegetables: Try a mix of carrots, bell peppers, zucchini, or asparagus, lightly seasoned and baked alongside the chicken.
- Steamed Greens: Broccoli, green beans, or Brussels sprouts offer a fresh contrast to the rich, savory flavors of the chicken.
- Mashed or Roasted Sweet Potatoes: Their natural sweetness balances the savoriness of the chicken while adding fiber and essential vitamins.
- Sautéed Spinach or Kale: Tossed in garlic and olive oil, these greens bring a bold, earthy flavor that complements oven baked chicken.
✔ Pro Tip: Drizzle a little homemade garlic butter or lemon herb sauce over your veggies for extra flavor.
Incorporating Sliced Chicken Breasts into Salads
Adding oven baked chicken to salads is a quick, healthy, and satisfying way to enjoy your protein. Whether you like crisp romaine, leafy greens, or grain-based salads, chicken makes a perfect protein boost.
✔ Best Salad Ideas for Baked Chicken:
- Classic Caesar Salad: Toss romaine lettuce, Parmesan cheese, croutons, and creamy dressing, then top with warm, sliced chicken breast.
- Mediterranean Chickpea Salad: Combine cucumbers, cherry tomatoes, red onions, feta cheese, and a lemon-olive oil dressing for a fresh, protein-packed meal.
- Spinach & Avocado Salad: Pair baby spinach, avocado slices, walnuts, and cranberries with a light balsamic vinaigrette.
✔ Pro Tip: Use leftover chicken for meal-prepped salads throughout the week—it keeps well in the fridge!
Using Chicken Breasts in Pasta and Grain Dishes
If you love hearty, filling meals, incorporating oven baked chicken into pasta or grain-based dishes takes your meal to the next level.
✔ Best Pasta and Grain Dishes with Chicken:
- Creamy Garlic Parmesan Chicken Pasta: Slice baked chicken breasts and toss them into a creamy garlic parmesan sauce with whole wheat pasta.
- Lemon Herb Chicken & Rice Bowl: Pair juicy, oven roasted chicken with brown rice, sautéed mushrooms, and a drizzle of lemon butter sauce.
- Pesto Chicken Wrap: Layer chicken breast slices in a whole-grain wrap with fresh basil pesto, lettuce, and roasted red peppers.
- Quinoa & Roasted Veggie Bowl: Serve sliced chicken breasts over fluffy quinoa, roasted sweet potatoes, and a tahini drizzle.
✔ Pro Tip: Dice or shred leftover baked chicken and store it in the fridge—it’s perfect for quick pasta tosses and grain bowls!
Making Meal Prep Easy with Baked Chicken Breasts
If you’re meal-prepping for the week, oven baked chicken breasts are a lifesaver! They can be used in multiple meals without getting boring.
✔ Best Ways to Use Prepped Chicken Throughout the Week:
- Quick sandwiches or wraps for lunch.
- Easy stir-fries by tossing diced chicken breast into veggies and sauce.
- Protein-packed snack boxes with hummus, cheese, and whole-grain crackers.
Storing and Reheating Oven Baked Chicken Breasts Without Drying Them Out
Leftovers can be a meal prep lifesaver, but only if they still taste as good as they did fresh. If not stored or reheated correctly, your once juicy baked chicken breasts can become dry, rubbery, or flavorless. Let’s go over the best storage methods and reheating techniques to lock in moisture and retain flavor.
Proper Storage Methods: Keeping Chicken Fresh
To maintain flavor and texture, follow these best storage practices:
✔ Refrigeration: Store cooled chicken in an airtight container or wrap it tightly in foil. Properly stored, it stays fresh for up to 4 days in the fridge.
✔ Freezing: For long-term storage, wrap chicken breasts in plastic wrap and place them in a freezer-safe bag. This prevents freezer burn and keeps them fresh for up to 3 months.
✔ Whole vs. Sliced: If you plan to reheat later, store the chicken whole to retain moisture. Slice it only before serving to prevent dryness.
Reheating Chicken Without Losing Moisture
Reheating chicken breasts can be tricky—do it wrong, and you’ll end up with tough, chewy meat. Here’s how to reheat it the right way:
1. In the Oven (Best for Moisture Retention)
Preheat oven to 300°F (150°C).
Place chicken breasts in a baking dish with a splash of chicken broth or water.
Cover with foil and bake for 10-15 minutes until warm.
Why It Works: The low temperature and steam help reintroduce moisture, making the chicken tender again.
2. On the Stovetop (Quick & Effective)
Heat a skillet over medium-low heat.
Add a teaspoon of olive oil or chicken broth to prevent drying.
Reheat the chicken breast for 3-4 minutes per side until warm.
Why It Works: The added fat or liquid prevents the chicken from becoming dry while reheating evenly.
3. In the Microwave (Fastest, But Be Careful!)
Place chicken breast on a plate and cover with a damp paper towel.
Microwave in 30-second intervals, flipping after each, until heated through.
Why It Works: The damp paper towel creates steam, preventing the baked chicken from drying out.
Common Mistakes to Avoid When Baking Chicken Breasts
Even with the best ingredients and preparation, small mistakes can ruin your oven baked chicken breasts. Avoid these common pitfalls to guarantee juicy, flavorful results every time!
1. Overbaking: The #1 Cause of Dry Chicken
One of the most common mistakes is overcooking the chicken, which strips it of moisture, making it rubbery and dry.
✔ Solution: Always use a meat thermometer and remove the chicken from the oven as soon as it reaches 165°F (75°C). If you don’t have a thermometer, slice into the thickest part—juices should run clear, and the meat should be white with no pink center.
2. Skipping the Brining Process
If you want extra juicy baked chicken, brining is a game-changer. Many people skip this step, thinking it’s unnecessary, but it makes a huge difference in moisture retention.
✔ Solution: Soak your chicken breasts in a saltwater brine for at least 30 minutes before baking. This locks in moisture, preventing dryness.
3. Not Using Enough Seasoning
Chicken breasts have a mild flavor, meaning they need a good amount of seasoning to truly shine. Too often, people under-season, leaving the meat tasting bland.
✔ Solution: Don’t be shy with spices, marinades, or herb rubs. A simple salt, pepper, and olive oil combo works great, but experimenting with herb blends, spice rubs, or citrus-based marinades elevates the flavor.
4. Skipping the Resting Time
Many people slice into their baked chicken as soon as it’s out of the oven, but this is a big mistake! Cutting into it too early releases all the juices, leaving the meat dry.
✔ Solution: Always let the chicken rest for 5-10 minutes before slicing. This allows the juices to redistribute and keeps the meat moist and flavorful.
5. Baking Without Parchment Paper or Foil
Chicken breasts can dry out if exposed to direct oven heat for too long. Baking without parchment paper or foil can lead to uneven cooking and loss of moisture.
✔ Solution: Use a parchment-lined baking sheet or cover the chicken with foil for the first half of baking, then remove it for the last 10 minutes to let the edges brown.
Frequently Asked Questions (FAQs) About Oven Baked Chicken Breasts
Even with all the right techniques, tips, and tricks, you might still have some burning questions about how to make the perfect oven baked chicken breasts. Below are answers to some of the most frequently asked questions to help clear up any doubts!
1. How Long Should I Bake Chicken Breasts?
The exact baking time depends on the thickness of the chicken and the oven temperature. Overcooking can dry out the meat, while undercooking can leave it unsafe to eat. Follow this general guide for perfectly cooked oven baked chicken breasts:
375°F (190°C): Bake for 25-30 minutes for medium-thick chicken breasts.
400°F (200°C): Bake for 20-25 minutes for a balance of crisp edges and juicy meat.
425°F (220°C): Bake for 18-22 minutes for a golden-brown exterior and tender inside.
✔ Pro Tip: The best way to know when chicken is done is to use a meat thermometer. Insert it into the thickest part of the breast—once it reaches 165°F (75°C), it’s fully cooked!
2. Can I Bake Frozen Chicken Breasts?
Yes, you can bake frozen chicken breasts, but you’ll need to make some adjustments to cooking time.
✔ How to Bake Frozen Chicken Breasts Properly:
- Preheat the oven to 375°F (190°C).
- Place the frozen chicken breasts in a baking dish and add 10-15 minutes to the usual cook time.
- Bake for 40-45 minutes, depending on thickness.
- Always check the internal temperature—it must reach 165°F (75°C) before serving.
🚫 Avoid baking at high temperatures (400°F or higher) when cooking from frozen—this can cause the outside to cook too quickly while the inside remains raw.
✔ Pro Tip: If possible, thaw the chicken overnight in the refrigerator for better texture and even cooking.
3. What’s the Best Way to Season Baked Chicken?
Seasoning depends on personal preference, but here are some tried-and-true options to enhance the flavor of baked chicken breasts:
Classic Salt & Pepper: Keep it simple with salt, black pepper, and olive oil for a clean, natural flavor.
Herb & Lemon Blend: Combine garlic powder, thyme, rosemary, and lemon zest for a fresh, bright taste.
Spicy Rub: Use paprika, cayenne, and garlic powder for a bold kick.
Soy-Ginger Marinade: A savory umami-packed option with soy sauce, honey, and fresh ginger.
Pro Tip: If using a marinade, let the chicken breasts soak for at least 30 minutes (overnight for deeper flavor).
Conclusion
Oven-baked chicken breasts are an easy, delicious, and versatile option for any meal. By following these step-by-step techniques—from selecting the best quality chicken to proper preparation, seasoning, and baking—you’re well on your way to achieving juicy, flavorful results every time. Whether you opt for a simple salt and pepper rub, a fresh herb blend, or a bold spicy kick, your chicken will shine when baked to perfection. This method retains natural juices and minimizes added fats, making it a healthy choice that doesn’t compromise on taste.
Experiment with different seasonings and side dishes, such as roasted vegetables, crisp salads, or hearty pasta, to keep your meals exciting and varied. Remember that small details—like proper brining, even thickness through pounding, and letting the meat rest—make a big difference in texture and flavor. These simple yet effective steps ensure that your oven-baked chicken remains moist and tender, every single time. Embrace the versatility of this dish, and enjoy creating a range of delicious, protein-packed meals that will satisfy every palate. Happy baking and bon appétit!
Here is another excellent recipes you might enjoy, please be sure to try :